Two-Column Proofs and Logical Reasoning

The second unit in Geometry for me is Logical Reasoning. I do three things: 

  1. Inductive and Deductive Reasoning
  2. Conditional Statements
  3. Two-Column Proofs

Monty Python

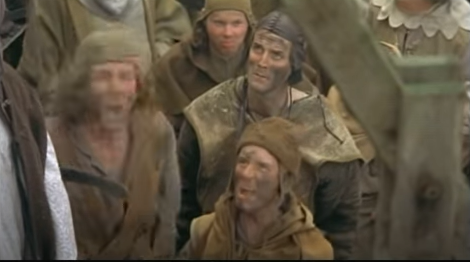
I have fun teaching inductive and deductive reasoning. I usually start the lesson by having students watch a YouTube clip of Monty Python and the Holy Grail. It’s a pretty hilarious demonstration of how drawing conclusions based on patterns can lead you to the wrong conclusion. This would be a great place to talk about stereotyping if you would like to go a little deeper into how people base information sometimes from the media or gossip. This lesson has 12 task cards to practice reasoning and knowing the difference between the two types. 

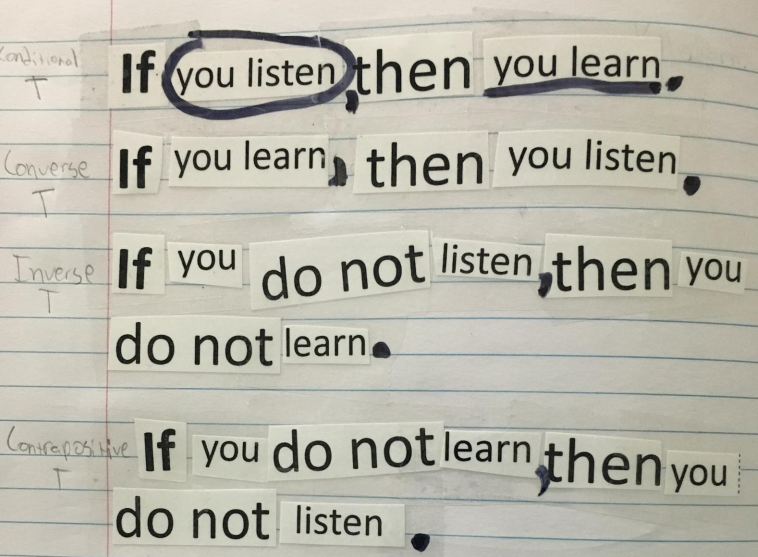
Conditional statements is also fun to teach. I love it when kids say that it doesn’t seem like we are learning math. We discuss where the hypothesis and conclusions are in the conditional statement so the students can write the converse, inverse and contrapositive. We also discuss counterexamples and biconditionals. This lesson has some hands-on activities where students create if/then statements and the related statements and tape them into their journals. 

conditional

The last part of this unit is spent on two-column proofs. This usually happens for me in October, sometimes earlier but close enough that I can show them a silly Halloween proof that I created. I made this up a long time ago after watching “It’s the Great Pumpkin, Charlie Brown.”  It’s got all the elements of a real proof. I’ve used this as a bulletin board in past years. Feel free to use this in your classroom.geometric-proofs-b

One thing that is in this lesson that helps my students is a set of matching cards. Students will match the property or definition with its name. I do this as a collaborative activity. Students enjoy this and it helps them to have some tools to use going into writing proofs. This is a beginning proof lesson. I only practice two-column proofs. In lessons that follow this one, I introduce the other types of proofs like paragraph and flowchart proofs. 

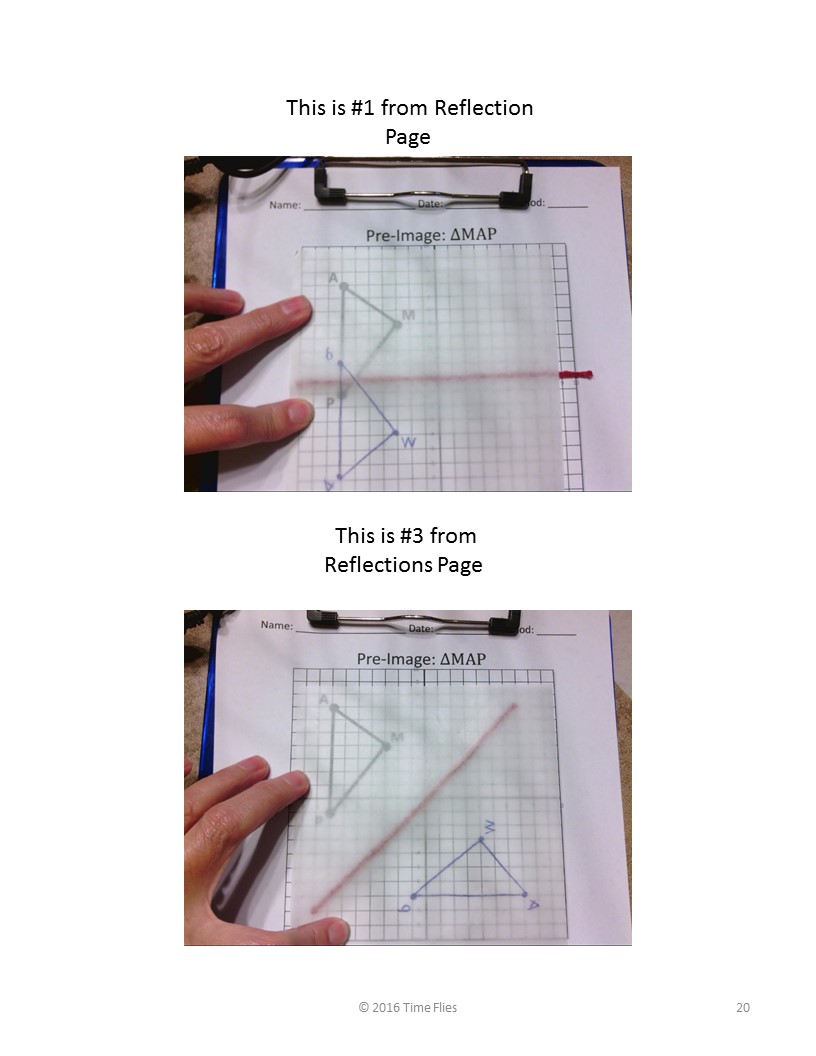
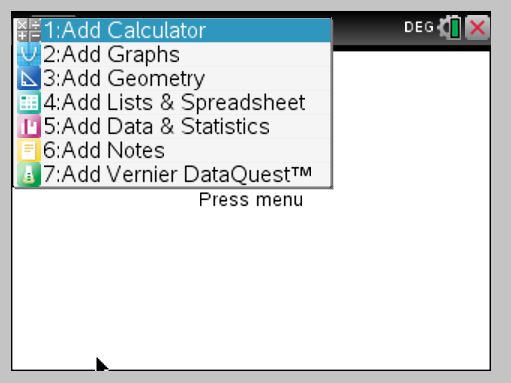
If you are teaching online, no problem. I’m in the process of making these lessons more online friendly. Teachers Pay Teachers has a new tool that can take a PDF and transform it into an interactive worksheet. Look for the “Use as a Digital Activity” button on products that are available for this. You as a teacher can modify it as you see fit then assign it to your students. 

I love this part of Geometry. It’s different from the norm in math. It’s always a fun time of year. If you’d like to use my lessons, then the best way to get them and save a little money is to purchase the Unit 2 Bundle

Good Luck and I hope you have a successful year!

Transformation in Geometry

I am excited after going through a transformations activity that I have created. I’m gonna have to say, it’s pretty good! (Just saying…)

The first thing I do is show my students a Mario Brothers Transformation PowerPoint that I created this year. It’s a free download on my TpT site. So FUN! I tell the students to number from 1 to 4 in their journal and then I go through the PowerPoint to see if they can name the different transformations. I want to know what they remember from middle school.mario-transformations

Next I have the students jot down a few notes and then I begin the hands-on part. I use patty paper and wikki stix. Every student was engaged, asking questions and YES….LEARNING! I show them pictures of me working on the transformations which is very helpful. I don’t have to stop and do it in front of them…pictures are worth a thousand words! The pictures are provide in the product and I think you will find them very useful.

transformations

What are wikki stix you ask? I think they are just thread or string that has been dipped into wax which means they will stick to things. I use them as my lines of symmetry as well as a tool for rotations as seen below:

transformations

transformations

If you haven’t done transformations this year, I hope you will check out my Transformations Activity. Included is a note page, pages for each type of transformation, a quiz, keys and pictures. You will have a great time working through this with your students. Let me know what you think! Hope to hear from you soon.

You Have TI-Nspires…Now What?

TI-Nspires are amazing calculators. There are so many features, don’t try to learn them all at once. First of all, get the teacher software! I can’t live without it. In my district, even the students have the software available on their laptops. It’s wonderful.

How do you get started? The first thing I learned was go to the HOME SCREEN and choose NEW DOCUMENT. If there is a screen that asks if you want to save, say no. Now choose what you want to do. If you are learning, you will only choose graph or calculator. This is what I still choose most of the time!

new-doc-screen  choice-screen

The calculator screen is easy to use. If you are looking for something specific it is probably here: (see below) I used this button to type in a cube root as seen in the next pic.

special-characters  calculator-screen

Let’s say you now want to graph something. You have a choice. Start completely over and go to the home button and go through the same steps explained above, or add a page to your document. Let’s add a page. Simply click CTRL (blue button) +Page (doc button below home.)

add-a-page   graphing-1

Choose Graph! Now you can type an equation. The x button is one of the white alphabet buttons at the bottom of the calculator. Hit enter when you are ready to graph. To graph a second equation, click the tab button and type in a new graph… or to change the first equation, after clicking tab, up arrow to the original equation. If you know this much, you are ready to use the calculator. The only other things that are nice to know at this stage is that ctrl t will pull up a table (and ctrl t will take the table off).

table

AND the menu button has many things that will help you. I suggest clicking the menu button and checking it out! I use #4 and #6 daily. #6 is where intersections and zeros are and #4 of course helps you change the window settings like on the 84+.

menu

My goal was to help you get started. If you will start using these features and become very familiar with the calculator, you will discover new things on your own. Your students will also help you discover things. The main thing is to get started! Don’t let those calculators just sit. They are really awesome and helpful!

How Strategic Seating Charts Transformed My Classroom

When I was in the classroom, few things made as big of a difference as my seating chart. Not just for management—but for focus, behavior, and student growth.

If your students are off task, chatting too much, or not performing the way you expected… seating might be the quiet fix you didn’t know you needed.

How I Started the Year

On the first day of school, I always placed students in alphabetical order.
I kept that same chart for the first six weeks. Why?

  • It helped me learn names quickly
  • It gave me time to observe student behaviors and learning needs
  • It revealed who worked well together—and who definitely didn’t

By the end of that first grading period, I had a mental map of:

  • Who was quiet or loud
  • Who struggled to stay organized
  • Who needed to sit near the front to see or hear better
  • Who would need extra support for academics or behavior

Pairing with Purpose

As the second six weeks began, I moved from alphabetical seating to purposeful partner pairs.

slide1

I kept desks in rows, but created 8 rows with 4 seats per row. Yes, it was tight. But the structure worked.

When pairing students, I considered:

  • First six weeks grades (I often matched a high with a low)
  • Special education and behavior needs
  • Personality clashes or friendships that could become distractions
  • Physical space needs (for example, a student with a large backpack got a far-side seat)

I also moved students who had failed the first six weeks closer to my desk or into the front row for extra visibility and support.

One Trick That Saved My Sanity

I’ll admit it—I couldn’t stand when desks drifted out of position. So I put tape marks on the floor. Each row had a reference point, and the student in the front knew to reset it before leaving.

It was a small system, but it made a big difference in how calm and ready the room felt each period.

Built-in Talk Routines

Once students were paired, I  labeled rows—A and B—to create quick verbal tasks:

“A, tell your partner what perpendicular means. B, respond with a definition of parallel.”

These routines gave students regular chances to speak the language of math out loud. No extra prep for me—just built-in thinking practice.

Why I Gave Up on Free Seating

At one point in my career, I gave students total freedom: they chose seats, listened to music, even brought snacks. And it backfired. (Of course…what was I thinking?)

They were too relaxed… and too distracted. That’s when I realized: structure creates space for learning.

Once I took back control, I saw a huge shift in focus, engagement, and performance.

Small Shifts, Big Flexibility

After the second six weeks, I kept evolving the setup. The paired rows made it easy to shift into groups of four—just have the first and third seats of each row turn their chairs around.

Some of my favorite group activities were:

And yes—this is when my supply boxes became super helpful.
Sometimes I’d place them at each group of four, or scatter them around the room when students worked in pairs.

(If you haven’t seen my supply box system, check it out here).

The Bottom Line:
Seating is more than a classroom management tool. It’s a system that sets the tone, supports your teaching goals, and creates space for intentional learning.

Want better focus? Start with the seats.