Posted on — Leave a comment

Pi Day Activity

Slide1

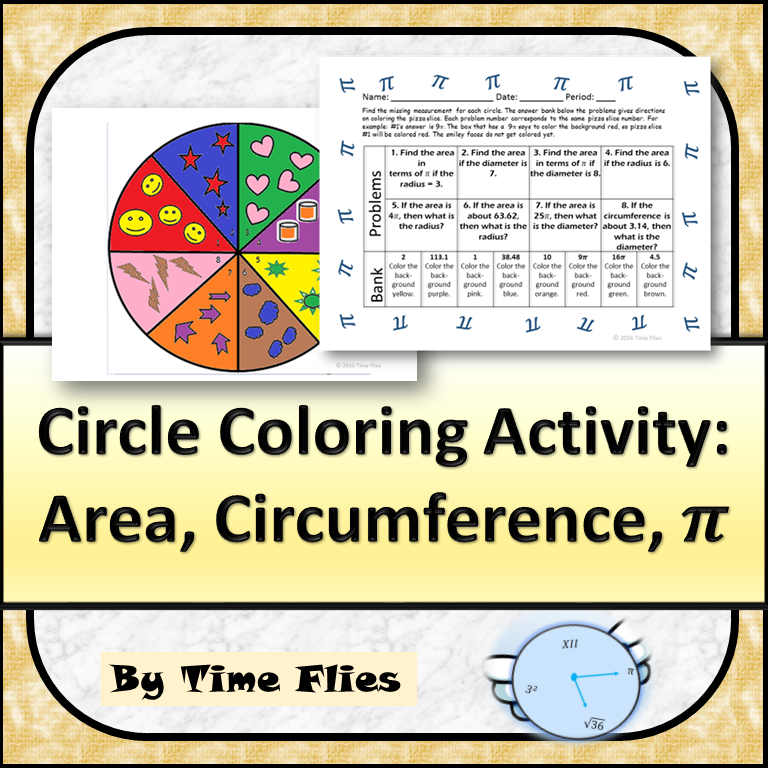
This coloring activity is a fun way to practice area and circumference problems. There are 16 problems in all. The students are asked to leave some answers in terms of pi. There are some problems that area is given and the student has to find circumference and vice-versa. The back of the activity has adding, subtracting, multiplying and dividing with pi. The variety of problems makes this resource fun but challenging!

Slide1
Buy This
Posted on — Leave a comment

Exponential Functions Activity

Slide1Exponential Functions Activity

This was my very first resource that I put on TpT. I love this activity. (I made a version for digital learning too!) Students have fun making a poster and using multiple representations. They are given several exponential scenarios to choose from such as a basketball bracket, a cockroach infestation, a zombie takeover, friendship bread, chain letters and more. Here’s a sample poster of a football stadium after a game has ended:

go-tigers

After students look at their choices, they may come up with their own situation. This is what differentiation is all about…students making decisions based on interests!

When I was getting my masters, we were encouraged to study exponentials in depth. This opened my eyes to all types of situations that are out there. I was inspired to create Exponential Functions: 6 Stations. Look at the titles of the stations below. Have you ever played Tower of Hanoi? There are free phone apps and online math sites that have this interactive game. Click here to see what I’m talking about! The number of discs and the least number of moves to get all the discs to tower 3 is an exponential function! How cool is that! Kids love games, so when you introduce this they will want to play for hours. Some of my buyers have turned these stations into other activities. After you see them all, you can decide for yourself how it works best for your room. These are not quick stations, they are more like math centers!

6-stations

I still was not finished creating exponential resources. I couldn’t get enough! I wanted a unit! I wanted that unit to be about multiple reps and I wanted it to include transformations, compound interest and compound interest where the compounding is continuous which would bring in the constant e. I wanted another data collecting activity because there needs to be practice writing exponential functions. At the end of the unit, I wanted an assessment. I believe in differentiation, so I created 5 assessments that cover the same thing but with different difficulty levels. The assessments are a part of my unit in my TpT store, but I also sell them separately. The unit also contains warm ups and cool downs.

I make the unit a booklet and let the students work through it at their own pace. There are a few places in the unit, when the teacher needs to stop the class and have some discussions, but for the most part, the students can work through this on their own. Once they’ve made it through the booklet, we trade and grade. Students will know exponential functions forwards and backwards by the time they are finished with this unit.

Here are the links to my Exponential Functions Unit and my Exponential Functions Bundle (which saves you money and has all the resources in it plus 20 task cards),  but I’d like to leave you with a freebie. This is an exponential activity that I have done over the years. It’s fun, interactive and tasty! Enjoy!

Recently, I needed a digital version, because I was teaching my class from 2000 miles away. I was able to watch and interact with my students in this version of my Exponential Function Activity: 

Posted on — 1 Comment

Are Your Students College Ready? 5 Teacher Challenges!

Are you preparing your students for college entrance exams? Do you know enough about the exams to help your students? I challenge you to start now by making a difference for the future of your students. You do not have to be a high school teacher to start this process. Make up your mind and let’s do this!

Challenge 1:

Learn more about the SAT/PSAT and ACT. Go to the CollegeBoard website and the ACT website and browse. See what those tests are like. Do you know what topics are covered on those tests? Learn the importance of the PSAT…it’s more than just practice! Do  you know the purpose of the ACCUPLACER (or if you are from Texas it’s called the TSI)? The more you know about these tests, the better you will understand how you can help prepare your students.

Challenge 2:

If you teach 5th grade math, does it matter if you know what is on the math portion of the SAT? I challenge ALL math teachers (elementary, middle school and high school) to take the math portion of the SAT or ACT. If you do not teach math, I challenge you to pick any of the portions of the SAT or ACT and take them…especially if it’s been awhile since you graduated from college! If you are a science teacher, check out the ACT science test. WOW! It’s crazy all the reading involved on that test! Open your eyes to what is on these tests and how they ask questions.
slide1

Challenge 3

Implement one thing (a topic, a strategy, a visual) that will help your students be successful on college entrance exams. Here are some examples:

1)Pick a topic to focus on and spiral into your lessons every so often.

2)We all have important vocabulary that we cover, but Google SAT vocabulary list and create a word wall with some of these words.

3)Pick a testing strategy like timing your tests.

4)If you teach math, have calculator and non-calculator portions of your tests.

5) Use actual SAT or ACT or ACCUPLACER questions as bell-ringers. If you teach younger grades, simplify them slightly if needed.

6) Show your students how to get on Khan Academy. This site is awesome and has great college entrance practice.

Challenge 4

Talk about these tests in class. Start talking about them while the students are young so they know what’s coming and know what to expect. The great thing about this topic is you are starting the conversation about going to college. Some students do not get to have that conversation at home, so the only place they might hear it is from you.

Challenge 5

If you teach 9 – 11th graders, encourage your students to go ahead and take the ACCUPLACER or the equivalent in your state. It doesn’t cost much and they can take it as many times as they like. Have them bring the paperwork back to you and you can help them figure out their strengths and weaknesses. In Texas, the students must make a certain grade on the three parts so they do not have to take remedial college math and English classes. My next door neighbor took her 8th grade daughter up to the nearest community college last year and had her take the test. Guess what? She passed all three portions and she hasn’t even taken high school Algebra yet. My school encourages students to take the test when they are ninth graders. Many of them pass the first time, but most do not. This is when I step in and start reviewing them for the next time they take it.

I’ll have to admit, that I did not see the importance of learning as much as I could about these tests until last year. I was given a class full of seniors that had not passed the TSI yet and my job was to help them pass it before the end of the semester. I found very little help online when it came to work that I could give them. I had no choice but to create my own reviews. I had to research the topics and I came up with 7 packets. I offer these in my TpT store. I also bundled all 7 reviews. My son is a senior, so I decided to put his picture on the front of the packet. I have to brag on him, he passed the TSI with flying colors. He is a fast test taker. It only took him an hour and five minutes to take all three portions. It’s an interesting test. If you do not pass the first 2o questions or so, it gives you 4o more to do, so that’s why it takes some students forever to take it.

tsi-bundle
College Ready Bundle

After most of the students in my class had passed the TSI, I couldn’t let them come to class everyday and do nothing, so I started reviewing for the SAT and ACT. Again, I created my own material. I’m glad I did because now I know so much more about those tests. I plan on making more SAT reviews when I get a chance. I have bundles and individual products. The bundles are seen here:

sat
SAT Bundle

act
ACT Bundle

I basically had to write my own curriculum for a semester. That’s not easy when you are also teaching Algebra II and Pre-Cal. If you are in the same boat and need curriculum for a senior math class, then I’ve bundled all three entrance exam reviews into a MEGA bundle as seen below:

bundle-of-3
MEGA Bundle

Please take this advice and start familiarizing yourself with these very important tests. See if you can add anything to your routine that might help your students. Be creative in your implementation and don’t reinvent the wheel. I hope I have motivated you to start your “College Ready Research.” Encourage your colleagues to do the same. Send me some of your ideas if you get a chance. Good Luck!


← Back

Thank you for your response. ✨


Posted on — Leave a comment

Why Are Literal Equation So Hard?

literal-equations

Parks and Rec has to be one of my favorite shows and Rob Lowe is very cute, STILL! If you’ve never seen the show, put this on your to-do list! You’ll think it’s weird at first but the characters are hilarious. Rob Lowe joins the show during the second season. He literally says literally 20 times a show…maybe I’m exaggerating, but he does say literally a lot! Watch it…you’ll love it. It’s a nice way to relax and get your mind off school.

So why am I thinking about literal equations? The physics teacher is telling me that the kids can’t solve literal equations! I could have told him that :), but why can’t they? I know my students can solve 4x = 8, but they can’t solve d = rt for r. What’s the issue? I think it’s several things:

  1. They are solving 4x = 8 in their head. They know that 4 times 2 is 8, so x has to be 2. They aren’t thinking about inverse operations. I’m realizing some students still do not know that 4x means 4 times x.
  2. When students see a problem with only letters in it, they automatically think that it’s hard. They are not making the connection that really all that is happening is that r is multiplied by t. If they knew the operation taking place in the problem, then they should ask what is the inverse operation.
  3. Students are not understanding that all they are “UNDOING” the operations to solve for one of the variables…which leads me to wonder if anyone has ever explained that when you solve equations, you are actually doing PEMDAS backwards.


I’ve created a lesson that addresses all three of the issues above. At first, I think the student should analyze the problem by writing the equation in words so I can see if they understand what operations are taking place. I then ask them to circle the variable they are solving for so they can have a visual of what needs to be by itself. The notes below are what I give the students to get them started on this process.literal-equation-explained

I take them through a problem similar to the one above and then I let them practice 4 problems that are similar to this. Below is a sample:literal-eq-with-wordsIf you like collaboration, these problems would be good for a sage and scribe activity. The sage tells the scribe what to write. The scribe has to stay quiet for a while and let the sage describe the steps and what needs to be written. I eventually let the scribe have some input because sometimes they are dying to help the sage. We switch roles for each problem.

Next, I give them a worksheet that has a regular equation with a literal equation that looks just like it. They do the regular one first and then the literal equation (they are solving for c). I keep telling them to remember what they did on the regular equation and follow those same steps. Here’s an example:comparison-of-equations

The final activity in this lesson is to help the students in their science class. I give them some science equations mixed in with a few math equations. I’m hoping by now, these problems will be easy.

science-lit-equ

There is one more reason students do not understand literal equations and it’s our fault as teachers.

4. Teachers work on literal equations for one day maybe two and that’s it. How can they really get it?

Let’s not make that same mistake again. I plan on recycling literal equations back into my lessons. I plan on using them in bell-ringers and I plan on putting them on assignments and tests in the future. How many people can understand something, especially in math, after one or two days? Remember that when a student first sees a literal equation, it looks foreign to them. They are not going to make the connection that they are just equations (at first).

We can help make the student more successful in math and science if they learn to solve literal equations. Don’t take this topic lightly. Ask your science teachers what else students have a hard time with when it comes to math in their class. Bring something to write with, because you’ll get a list of items. Other things that my physics teacher has mentioned is conversions, graphing linear equations (knowing slope, independent and dependent) as well as being able to graph bar graphs.

Good luck and if you would like to purchase my literal equations activity, click below:

literal-equations-pic

Literal Equations for Math and Science

Posted on — 2 Comments

Two-Column Proofs and Logical Reasoning

The second unit in Geometry for me is Logical Reasoning. I do three things: 

  1. Inductive and Deductive Reasoning
  2. Conditional Statements
  3. Two-Column Proofs

Monty Python

I have fun teaching inductive and deductive reasoning. I usually start the lesson by having students watch a YouTube clip of Monty Python and the Holy Grail. It’s a pretty hilarious demonstration of how drawing conclusions based on patterns can lead you to the wrong conclusion. This would be a great place to talk about stereotyping if you would like to go a little deeper into how people base information sometimes from the media or gossip. This lesson has 12 task cards to practice reasoning and knowing the difference between the two types. 

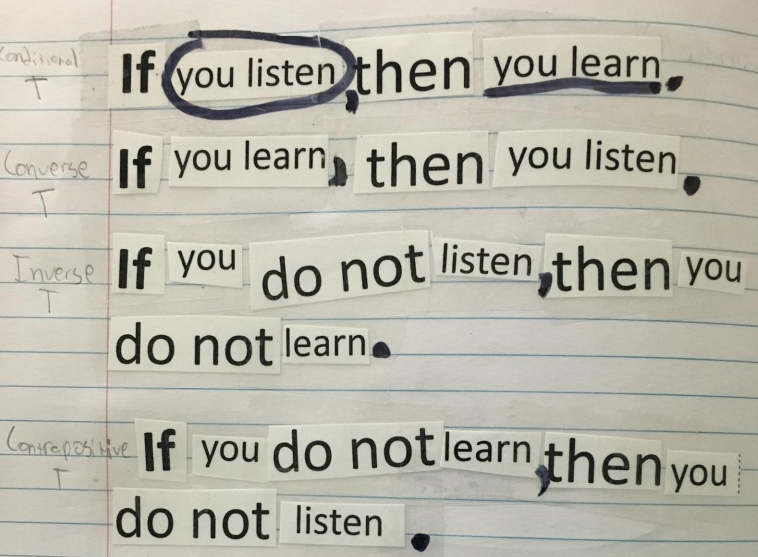
Conditional statements is also fun to teach. I love it when kids say that it doesn’t seem like we are learning math. We discuss where the hypothesis and conclusions are in the conditional statement so the students can write the converse, inverse and contrapositive. We also discuss counterexamples and biconditionals. This lesson has some hands-on activities where students create if/then statements and the related statements and tape them into their journals. 

conditional

The last part of this unit is spent on two-column proofs. This usually happens for me in October, sometimes earlier but close enough that I can show them a silly Halloween proof that I created. I made this up a long time ago after watching “It’s the Great Pumpkin, Charlie Brown.”  It’s got all the elements of a real proof. I’ve used this as a bulletin board in past years. Feel free to use this in your classroom.geometric-proofs-b

One thing that is in this lesson that helps my students is a set of matching cards. Students will match the property or definition with its name. I do this as a collaborative activity. Students enjoy this and it helps them to have some tools to use going into writing proofs. This is a beginning proof lesson. I only practice two-column proofs. In lessons that follow this one, I introduce the other types of proofs like paragraph and flowchart proofs. 

If you are teaching online, no problem. I’m in the process of making these lessons more online friendly. Teachers Pay Teachers has a new tool that can take a PDF and transform it into an interactive worksheet. Look for the “Use as a Digital Activity” button on products that are available for this. You as a teacher can modify it as you see fit then assign it to your students. 

I love this part of Geometry. It’s different from the norm in math. It’s always a fun time of year. If you’d like to use my lessons, then the best way to get them and save a little money is to purchase the Unit 2 Bundle. 

Good Luck and I hope you have a successful year!

Posted on — 2 Comments

Transformation in Geometry

I recently went back through a transformations activity I created years ago. The opening presentation needed an update.

So, I created Transformations with Millie, a short animated presentation that introduces dilation, reflection, translation, and rotation. It’s a free download in my TpT store and includes both PowerPoint and Google Slides versions. Students can use the presentation to jot down the four transformations and a quick description of what happens in each one.

When I taught this lesson, we moved from those opener into the hands-on part. We used patty paper and Wikki Stix, and every student was engaged, asking questions and—YES—learning!

I also took pictures of myself working through the transformations. Instead of stopping to demonstrate every step in front of the class, I could show students the pictures as they worked. Pictures really are worth a thousand words! Those demonstration photos are included in the activity, and I think you’ll find them very useful.

What are Wikki Stix you ask? I think they are just thread or string that has been dipped into wax which means they will stick to things. I use them as my lines of symmetry as well as a tool for rotations as seen below:

If you haven’t done transformations this year, I hope you will check out my Transformations Activity. Included is a note page, pages for each type of transformation, a quiz, keys and pictures. You will have a great time working through this with your students. Let me know what you think! Hope to hear from you soon.

Posted on — Leave a comment

You Have TI-Nspires…Now What?

TI-Nspires are amazing calculators. There are so many features, don’t try to learn them all at once. First of all, get the teacher software! I can’t live without it. In my district, even the students have the software available on their laptops. It’s wonderful.

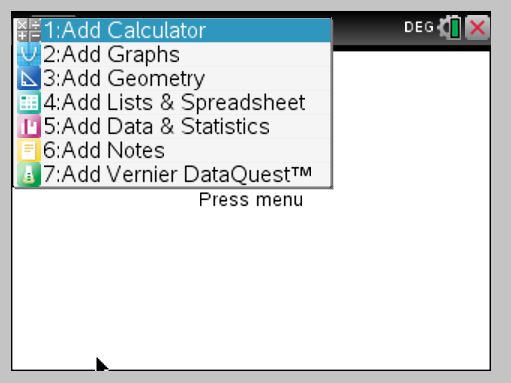
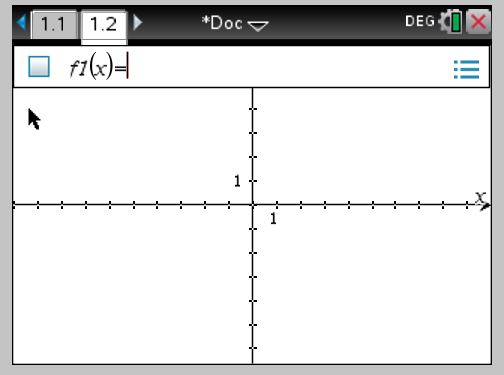
How do you get started? The first thing I learned was go to the HOME SCREEN and choose NEW DOCUMENT. If there is a screen that asks if you want to save, say no. Now choose what you want to do. If you are learning, you will only choose graph or calculator. This is what I still choose most of the time!

new-doc-screen  choice-screen

The calculator screen is easy to use. If you are looking for something specific it is probably here: (see below) I used this button to type in a cube root as seen in the next pic.

special-characters  calculator-screen

Let’s say you now want to graph something. You have a choice. Start completely over and go to the home button and go through the same steps explained above, or add a page to your document. Let’s add a page. Simply click CTRL (blue button) +Page (doc button below home.)

add-a-page   graphing-1

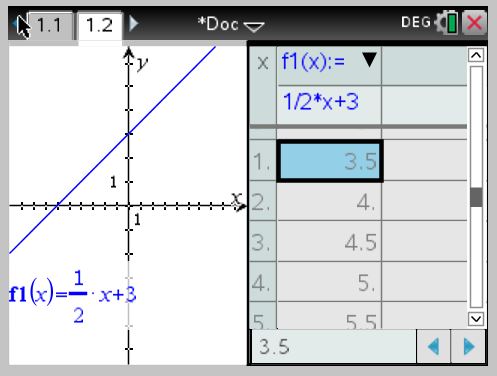
Choose Graph! Now you can type an equation. The x button is one of the white alphabet buttons at the bottom of the calculator. Hit enter when you are ready to graph. To graph a second equation, click the tab button and type in a new graph… or to change the first equation, after clicking tab, up arrow to the original equation. If you know this much, you are ready to use the calculator. The only other things that are nice to know at this stage is that ctrl t will pull up a table (and ctrl t will take the table off).

table

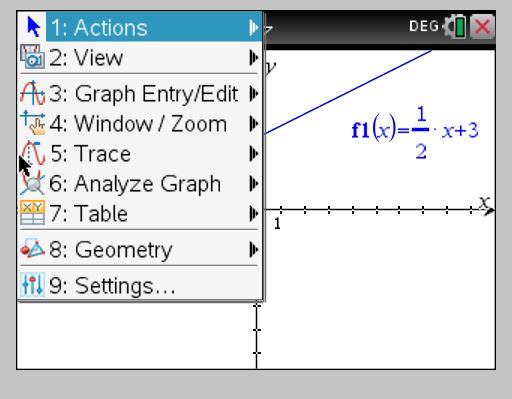
AND the menu button has many things that will help you. I suggest clicking the menu button and checking it out! I use #4 and #6 daily. #6 is where intersections and zeros are and #4 of course helps you change the window settings like on the 84+.

menu

My goal was to help you get started. If you will start using these features and become very familiar with the calculator, you will discover new things on your own. Your students will also help you discover things. The main thing is to get started! Don’t let those calculators just sit. They are really awesome and helpful!

Posted on — Leave a comment

How Strategic Seating Charts Transformed My Classroom

When I was in the classroom, few things made as big of a difference as my seating chart. Not just for management—but for focus, behavior, and student growth.

If your students are off task, chatting too much, or not performing the way you expected… seating might be the quiet fix you didn’t know you needed.

How I Started the Year

On the first day of school, I always placed students in alphabetical order.
I kept that same chart for the first six weeks. Why?

  • It helped me learn names quickly
  • It gave me time to observe student behaviors and learning needs
  • It revealed who worked well together—and who definitely didn’t

By the end of that first grading period, I had a mental map of:

  • Who was quiet or loud
  • Who struggled to stay organized
  • Who needed to sit near the front to see or hear better
  • Who would need extra support for academics or behavior

Pairing with Purpose

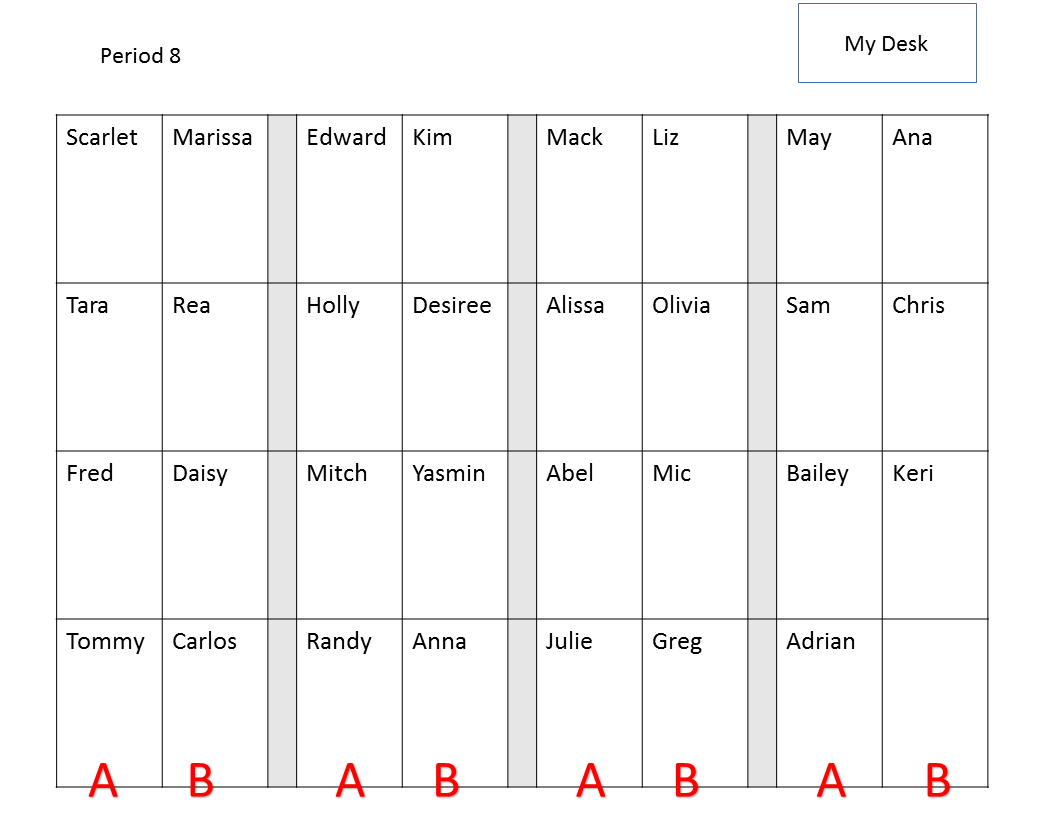
As the second six weeks began, I moved from alphabetical seating to purposeful partner pairs.
slide1

I kept desks in rows, but created 8 rows with 4 seats per row. Yes, it was tight. But the structure worked.

When pairing students, I considered:

  • First six weeks grades (I often matched a high with a low)
  • Special education and behavior needs
  • Personality clashes or friendships that could become distractions
  • Physical space needs (for example, a student with a large backpack got a far-side seat)

I also moved students who had failed the first six weeks closer to my desk or into the front row for extra visibility and support.

One Trick That Saved My Sanity

I’ll admit it—I couldn’t stand when desks drifted out of position. So I put tape marks on the floor. Each row had a reference point, and the student in the front knew to reset it before leaving.

It was a small system, but it made a big difference in how calm and ready the room felt each period.

Built-in Talk Routines

Once students were paired, I  labeled rows—A and B—to create quick verbal tasks:

“A, tell your partner what perpendicular means. B, respond with a definition of parallel.”

These routines gave students regular chances to speak the language of math out loud. No extra prep for me—just built-in thinking practice.

Why I Gave Up on Free Seating

At one point in my career, I gave students total freedom: they chose seats, listened to music, even brought snacks. And it backfired. (Of course…what was I thinking?)

They were too relaxed… and too distracted. That’s when I realized: structure creates space for learning.

Once I took back control, I saw a huge shift in focus, engagement, and performance.

Small Shifts, Big Flexibility

After the second six weeks, I kept evolving the setup. The paired rows made it easy to shift into groups of four—just have the first and third seats of each row turn their chairs around.

Some of my favorite group activities were:

And yes—this is when my supply boxes became super helpful.
Sometimes I’d place them at each group of four, or scatter them around the room when students worked in pairs.

(If you haven’t seen my supply box system, check it out here).

The Bottom Line:
Seating is more than a classroom management tool. It’s a system that sets the tone, supports your teaching goals, and creates space for intentional learning.

Want better focus? Start with the seats.

Posted on — Leave a comment

How Do You Know If Your Students Are Learning?

Since I’m a math teacher, I love data. I know I’m in the minority. Collecting data on students shouldn’t be that difficult. How do you know if your students are really “getting it” if you don’t assess, collect data and plan accordingly?

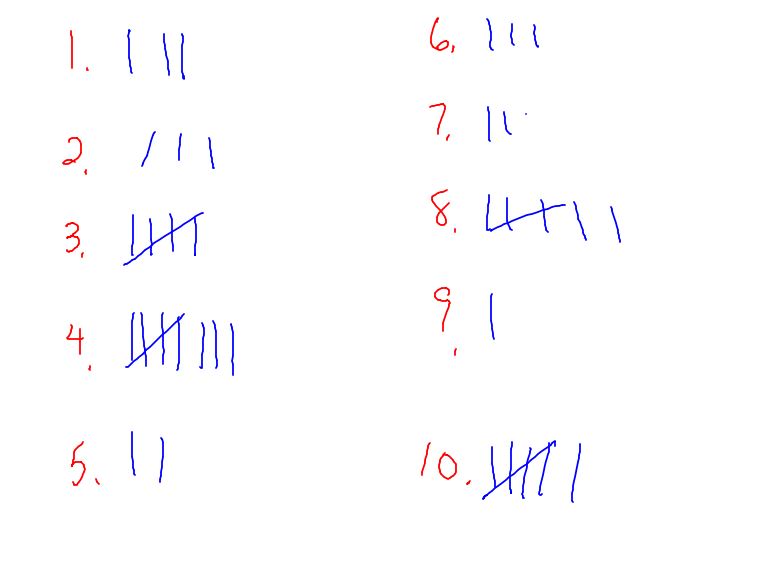
I like to collect data on questions on tests. I want to know what the most missed questions were, so I can reteach that material again. If you don’t have time to collect the data yourself, let the students help. Have them go put tally’s on the board for the questions they missed! Now you can analyze the most missed questions.

capture

It’s hard after a test to find time to reteach, so be creative! I have a resource for ideas on recycling weak objectives. Check it out!

Recycling Weak Objectives

When things are crazy at school and you feel like you are unorganized and you are behind in your curriculum, remember your real purpose: to teach kids! Really teach…so they learn. If they aren’t learning and you’re working harder than them, something is wrong. Take a deep breath and gain control. YOU know what is best for your students. Make sure they are truly learning.

When I was a young teacher I remember saying, “Well I taught it to them, so I can’t help it if they don’t know it.” That’s awful! I presented the material, but I didn’t check for understanding. I didn’t ask good questions and I apparently was not planning on reteaching. I hope you don’t make the same mistakes as me. Teaching is very rewarding when you see good results. Ask yourself when you are planning a lesson, “How will I know if they got it?” Formative assessments are quick checks to see if students understand.

Examples of formative assessment: Asking questions as you walk around, a quiz after a lesson, a ticket out, a quick write, partners retelling how to do a process…the list goes on. It doesn’t have to be spectacular, but it does need to be done on a daily basis.

Plan your formative assessments and you will be amazed. You will learn very quickly, what you need to immediately reteach. You will also figure out quickly how to teach it differently AND by the end of the day, you know the best way to teach that particular topic.


Posted on — Leave a comment

The Secret to Discipline!

For years I did not know what it took to have discipline in my classroom. I’m an easy going person and it’s not in my personality to deal with behavior. I’ve had some miserable years where I let kids get away with too much and I would go home exhausted and upset.

I usually give surveys at the end of the year to help me improve. One year in the survey, several kids said that they had a hard time learning in my classroom because I let kids disrupt the class and I did nothing about it. Wow! I felt awful. That woke me up. I looked at my classroom full of students a lot differently after that.

I was a coach for many years and I felt like if I wrote referrals and sent kids to the office, that it looked like I couldn’t handle my business in my room. Coaches are supposed to have total control, right? I also was lazy and didn’t want to go through all the steps it took. The thought of documentation, calling parents and setting up conferences was enough to keep me from finding a good method of dealing with behavior issues.

Here’s what I finally learned that worked for me:

Secret #1: Be firm. Not too nice and not too mean. You have to find a happy balance. If I say something, I have to stick to it. If I tell someone to be quiet or I’ll call their mom, then I have to call their mom. That’s not being mean, it’s doing what I said I was going to do.

Secret #2:  Start from the beginning. It’s hard to try to discipline in the middle of the year. You will have a very hard time getting your students on track if you wait that long. On the first day of school, if you notice a kid that is already being rowdy, that’s a warning sign. Ninety-nine percent of your kids will be very quiet the first day of school. I’ve been teaching for 30 years and I’ve noticed that the kids that are bold and rowdy the first day could be the ones you need to start with right away. (Hey that rhymes! First Day…Right Away!)

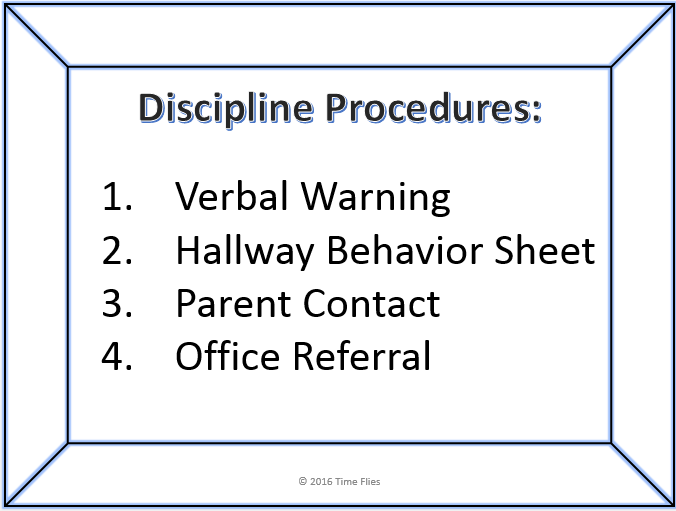
Secret #3: Have a plan! Create a plan you can live with. It needs to be something that you will follow and something that your administration will back. It needs to include documentation, notifying parents and conferencing with the student. I have a plan in my TpT store that does exactly this:

Behavior Plan for Secondary Students

Go check it out if you’d like, but it might not fit your personality or your situation or grade level. My plan is for secondary students. It will probably work for students as young as 5th grade. If you are a young teacher, get with a veteran teacher and ask them what they do. You will be so glad that you put a plan in place. Your students will love you for this and you will be amazed at how much you can accomplish in a classroom where you can actually teach.

So remember:

*Be firm

*Start from the beginning

*Have a plan