I’ve put together a set of reviews both in PDF form and Digital Form for College Readiness Assessments. The reason for creating this resource is because I started teaching at an Early College High School about 5 years ago and I had no resources for my students to prepare them. I’m in Texas, so my students take the TSI. It is very similar to the ACCUPLACER. The purpose of the test is to see if students are ready to take a college math class or a college English class, but of course I’m focused on the math portion of the test. I found that students struggled on the test and needed more help. I decided to break it into 7 parts:
All 7 Packets come in a bundle AND I’ve started creating a distance learning version in a Google Sheets format. I’m over halfway finished with this bundle. This bundle also includes some Google Forms quizzes that cover each of the packets. These quizzes come separately too so they can be purchased with the PDF versions as well.
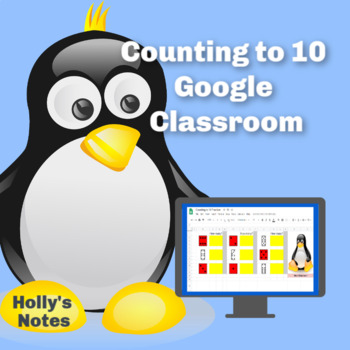
I’m fascinated with math no matter what level. I love how the brain learns math. Recently my daughter uploaded a new product to her store that I helped her with. We both love Google Apps and she was really interested in counting with Google Sheets. We had a long conversation about young students and their ability to handle Google Classroom material. We decided that a Google counting resource would be perfect for young students to not only work on their basic counting skills but to learn how to maneuver around in a Google Sheets. Since no one knows what school will be like in the future, we all realize that we need to be prepared for all situations. It’s great to have resources that can work in a normal classroom situation, but also be able to use it in a distance learning situation. This resource is engaging and has a few surprises.
My daughter and I are both obsessed with conditional formatting in Google Sheets. As students work through the sheets, boxes turn colors when answers are correct. There are a also a few times when a message appears. How fun is it, to know when you have answered a question correctly? Instant feedback is very rewarding!
See the example below for a before and after picture:
Notice the mistake and how the cell did not turn blue.After the last answer is typed, there is a message!
The first 4 sheets, walk the student through using the arrow keys, using the delete key, using the undo and redo icons, and more. The rest of the activity is helping students think through counting, what comes next, modeling the numbers and deleting things that don’t belong. If you’d like to see more, go check it out in my daughter’s store. Be sure to click the video preview to see the resource in action.
I hope we get a chance to make more of these activities before school starts. Technology is what it’s all about these days, so hopefully we will have a chance to work on another project together soon!
Algebra 1 is a fun but challenging class to teach. So many thoughts run through my head when I think about the beginning of the year in Algebra. One of the biggies is how much do the students remember from their previous math class? This is especially a big question since last year our district went to a distance learning format. I’m not sure what to expect from the incoming students, so I need a plan.
This year will be interesting. Our district has decided to have both online learning and in class learning. I’m working hard to make sure I have plenty of lessons that will work for either scenario. I’m going to start the year off with a two day review of number sense, order of operations and basic operations with integers. I’ve used this in the past because I always get a range of abilities, so I want to know where the students are. I have a print version of what I use and I’ve recently made a digital version. After I do the two day lesson, I give the students 3 quizzes (yep 3… because I want the repetition and plus it’s a challenge). All the quizzes are similar to each other but ask slightly different questions. The quizzes contain 15 questions. To move to the next quiz, students must make an 80 or better. If they don’t, they retake it. (These are timed because I don’t want the students to take too long. Either they know it or they don’t.) This can last up to 3 weeks. It’s not hard to keep up with because I take a grade on each quiz. Here’s a peek at the print version of the quiz vs. the Google Forms version:
The majority of the six weeks should (and hopefully will) be spent on solving equations. The days in the plan are block-schedule days. We have classes every other day for 80 minutes except on Fridays when the classes are only about 35 minutes. Below is plan that I will follow with the activities:
I’ve linked the topics to some of my lessons and worksheets that I used in my TpT store, but as I see the need, I go find content in other places. My district uses a couple of resources that I pull from as well, but our students know how to find answers online for these assignments, so I don’t like to use them for homework.
If you’ve never used quizziz.com, you should try it. The kids really enjoy doing these. I like that the students can do them more than one time. I have the students show work in their journal. Basically it’s just a digital quiz with 4 answer choices. These are teacher-made and there are a ton to choose from on just about every topic.
One of my favorite digital resources is Boom Learning. If you like task cards, then you will love Boom Cards. Again, these cards are teacher-made. There are a variety of ways kids can answer questions. I started creating my own decks. I used two of my own creations the first six weeks. One set of Boom Cards covered patterns and how to write an expression from a pattern. The other set was for practicing solving equations and inequalities. The kids can go through them as many times as they want so they get a lot of practice and get the best grade possible. To use Boom Cards, you need a teacher account. The free account is perfectly fine, but you don’t get to see the reports. The best thing to do is to get a paid account which is only $15 – 35 dollars a year depending on which plan you choose. Make your own decks or purchase decks. There are free choices as well. Click here to go check out my store. I’m brand new at making these, but I can already tell that this will be something I work on because all of my classes love Boom Cards!
After I get used to my students and find out who has gaps in their learning, then it will be time to dive into tutoring. I will engage my students through online tutoring this year. It will be an interesting year to say the least. I know that I will need patience and I will need to be flexible. I’m ready for anything and I hope you are too. I wish you well in your new year!
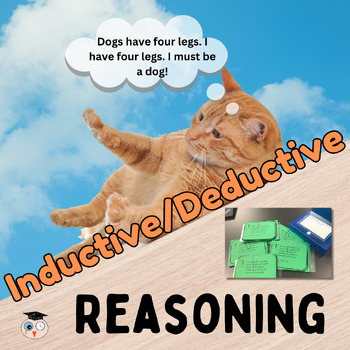
One of my favorite Geometry lessons is the one introducing inductive and deductive reasoning. It’s fun and engaging. I like to open the lesson by showing the students a YouTube video: Monty Python Deductive Reasoning (Should be called Inductive Reasoning, but oh well!)
This lesson has many opportunities for discussions on how people reason and come to the wrong conclusions. You can bring up the media, social media, racism and many topics where people might come to the wrong conclusions. I also like to talk about predicting weather. The topics are endless.
My lesson from Teachers Pay Teachers has several handouts that can be added to the student’s interactive notebook. One of the activities is to have students cut out the examples seen below and place them with the correct headings: Deductive or Inductive.
The lesson also includes some 12 task cards. I like to group the students into fours and have them turn their desks together. They put the task cards in the middle of the tables and select a card, answer it on an answer document and then place the card back into the middle of the pile. Here’s a sample:
Finally, the lesson has a short 3 question worksheet that I like to use as a group quiz. I have the students work together through the quiz. They all have to write on their own paper. I assign each person a letter and they put it beside their name. After about 15 minutes or less, I spin a spinner that has A, B, C, or D on it. The person with the letter I land on, puts their paper on top and that is the one I grade for the group. I tell them this ahead of time. This gives them incentive to work and make sure everyone is participating.
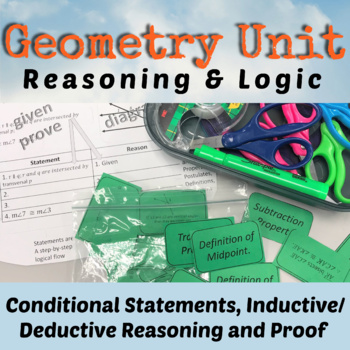
Here is a copy of the resource that I have on TpT. Take a look. It’s also a part of a unit as well as in my Geometry Curriculum.